Private VLANs when, where, & how.
Recently PVLANs came into a design discussion, which in turn led into me reminiscing on my Route/Switch days. So naturally when I wanted to re-visit the topic if anything to make sure I still remembered everything what was important and to see if any features have been added with the new IOS’s. It’s been a while since my last PVLAN deployment so here we go!
Terminology:
- Promiscuous Port – This is the ‘primary’ VLAN that can communicate with all the other Isolated & Community ports with the PVLAN environment.
- Isolated Port – This is a ‘secondary’ VLAN that will only communicate with the ‘primary’ promiscuous VLAN. Isolated ports cannot even communicate with other isolated ports. Since we are talking about VLANs, communication is blocked at the Layer 2 perspective. (At which layer do VLANs operate at, Layer 2)
- Community Port – This is another type of a ‘secondary’ VLAN, like Isolated ports a community port can also communicate with the ‘primary’ promiscuous VLAN. The big difference here is that a port configured in a ‘secondary’ community VLAN can also communicate with other ports configured as community ports. They will not however be able to communicate with ports configured in an ‘isolated’ VLAN.
Traffic Flows:
Since these Private VLANs operate at layer 2 it is worth pointing out some specific traffic flows, after all it is worth considering the implication of this isolation and typical broadcast/multicast flows:
- Broadcast Traffic
- The promiscuous port will forward broadcast traffic to all isolated & community ports. (Including trunks)
- The Isolated port will only forward the broadcast to a promiscuous port. (Including trunks)
- Community ports will forward broadcast to the promiscuous & other community ports. (Including trunks)
Configuration & Topology:

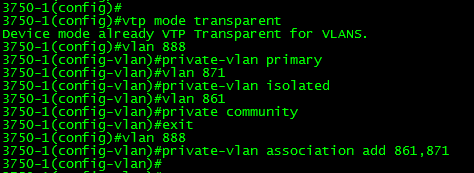
- The configuration is not too bad, you’ll notice the first thing we do is set the VTP to transparent mode. If you are running VTP v1 or v2 this needs to be done.
- Next we create a VLAN like normal, however under the vlan configuration, we set the PVLAN mode. Here we are setting VLAN 888 to be a ‘primary’ promiscuous VLAN.
- Next we create VLAN 871, and designate it as a ‘secondary’ isolated VLAN
- Followed by us creating VLAN 861, and marking is as a ‘secondary’ community VLAN.
- Once we finished creating our ‘primary’ & ‘secondary’ VLANs we need to associate our ‘secondary VLANs’ to our ‘primary’ VLAN.
To re-cap, we set the VTP mode to transparent, created and assigned out promiscuous VLAN along with creating and associated our isolated & community VLANs, not too bad right?
Now that our VLANs are defined lets map these Layer2 private VLANs to a Layer-3 SVI:

So there, we created the SVI for VLAN 888 (The primary VLAN) and we associated the ‘secondary’ VLANs to the SVI with the private-vlan mapping add command. You’ll also notice the system message stating that our mapping was successful.
Now, that we have Layer-3 mapping lets go ahead and assigned a few ports to our private VLANs.

Here we, enter interface fa1/0/20, set the switchport mode to private-vlan host and configure port 20 to be an isolated port. (By placing this port in the isolated PVLAN)
Port fa1/0/21 on the other hand is configured to be in the ‘community’ VLAN.
Next, we are going to configure Port Fa1/0/22 to be a promiscuous so it can communicate with ports in both VLAN 861 & 871:

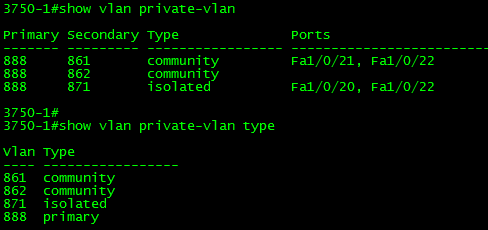
Verification:
Verifying the PLVLAN configuration is simple enough:
show int private-vlan mapping – Verify your Layer2 to Layer3 mappings

show int switchport – Verify Layer2 switchport parameters

show vlan private-vlan – Verify PVLAN setttings & ports.
SolarWinds Thwack Ambassador for VoIP Management

I know I’ve been quiet of my blog this month, but that’s not because I’ve forgetting about this site! For the month of September I’m spending some extra time over at Thwack, this is SolarWinds community where everyone likes to get together and talk about network management. I’ve talked about Network Management quite a bit on this blog in broad topics, and during September at Thwack I get focus on VoIP Network Management.
That announcement aside, the Thwack community is great! I’ve been member of the community for many years (Unfortunately under a few different accounts until I nailed one down a single account). Especially if you are SolarWinds user here are a few highlights of the community:
- Content Exchange – There is a good chance if you are looking for a particular report or custom poller someone else may have already thought about it to, and there also a chance that it might be available in the context exchange available to be downloaded an imported into your SolarWinds platform.
- Feature Request – Got an idea that will make a SolarWinds product easier or better enter this section, the more users that agree with your idea the better a chance it may get implemented into the system
- Feel free to ‘+1’ my request for better & more stream lined monitoring of F5 Virtual Server 🙂
- Great discussions & news updates from SolarWinds – There are many forums on Thwack that focus on different areas of network and systems management, with many great discussions going on. SolarWinds is also great at keeping their users in the know in regards to updates and possible upcoming features.
So far my posts have been about the following:
- How do you prepare for a VoIP deployment? What items are on your VoIP readiness checklist.
- I also took some extra time to consolidate many of the great recommendations into a single document found here.
- What tools do you use to troubleshoot VoIP related issues?
Come join the discussions!
VN-Tag you are becoming more maintstream.
VN-Tag, typically was a technology only seen in the Data Center (When using Nexus 2000 series FEXs) however this has started changing. If you check out Cisco’s new 6800’s series Catalyst switch you’ll see they are now pushing a new ‘instant access’ model. This new model allows us to deploy ‘dumb’ switches that are centrally managed by the main 6800 Chassis essentially making those switches act as ‘external linecards’. Now in the Data Center this is nothing new, sounds just like the Nexus 2000 Series Fabric Extenders (FEX’s) right? Well, they are a little more similar then you think deep down. VN-Tag is the technology used by Nexus 2k FEX’s with their upstream parent switch, that same VN-Tag is also being utilized in the Cisco 6800 Series with its downstream external switches.
The VN-Tag technology itself simply adds an additional header to the packet as it traverses between the ‘Instant Access’ (Or FEX) and the it’s parent switch, where all the switching occurs. It is important to call-out the ‘Instant Access’ switches do NOT do any local switches (once again just like Nexus 2k FEX) all the information is forwarded up the 6500 or 6800 chassis where the packet will get switched or routed accordingly.
Let’s take a quick look at the VN-Tag information itself:

Surprisingly it’s nothing more than an additional 6-bytes. The fields are as follows:
- EtherType [16-bits] = 0x8926
- Destination Bit [1-bit] – Indicates which direction the frame is flowing.
- Pointer bit [1-bit] –
- Destination VIF – [14-bits] – Identifies the destination port.
- Looped – Identifies the source vNIC, ment to identify multicast frames to ensure it is not forwarded back to where it originated.
- Reserved [2-bits] – For future use.
- Source VIF [12-bits] – vif_id of the downstream port.
- Version [2-bits] – Set to 0
Expanding the VN-Tag to products outside of the Nexus line is definitely a great move, and it definitely has great use-cases in many large enterprises that want a more consolidated approach for management, after all this easy way to cut down on your Layer-2 spanning-tree topology. You can also cut down on configuration/implementation time, since this technology allows you to pre-provision the ports on an Instant Access before it is actually connected to the chassis.
Additional Info:
Cisco Instant Access White Paper
P.S. – This was a blog post I had start middle/late last year when the 6800 & Instant Access were first announced. Finally got around to finishing it better late than never right?
FC vs FCoE
FC vs FCoE infrastructure, usually a common debate when designing the network infrastructure of a new Data Center or new part of a Data Center, after all the advantages of running a converged storage & IP network are hard to turn down. Many of us are probably already aware of the why FCoE is always good option vs the traditional dedicated FC design, but I wanted to point out one interesting fact that make FCoE more efficient and that fact stems down the Ethernet transport.
When FC frames are sent over a Fibre Channel network they are placed onto the physical medium in 8b/10b encoding which has an overhead of 25% to ensure the signal is sent successfully. (and intact with no corruption, essentially for every 8-bits, 2-bits are used to ensure the signal is still intact think of this an CRC or FCS for the electrical signals)
When we consider Ethernet, it is sent over the wire with a 64b/66b encoding, about a 3% overhead as the information hits the physical medium. So while FCoE may encapsulate the already large FC Frame with additional header & trailers FCoE from physical perspective is much more efficient means transmission. (So for every 64-bits sent to the wire, 2-bits are used for this ‘error checking’ and much better ratio than 8b/10b)
The 8b/10b encoding is used for 1, 2, 4, & 8 Gb Fibre Channel, the new 10+Gb Fibre Channel technologies are relying on 64b/66b encoded, which may tip the scales. However the converged infrastructure & cabling make FCoE the better option for most environments from a cost management perspective.
Random tidbit:
This is also an aspect the differentiates 100Mbps from 1Gbps from 10Gbps
- 100Mb Ethernet – 4b/5b encoding
- 1Gb Ethernet – 8b/10b encoding
- 10Gb Ethernet – 64b/66b encoding
VMworld sessions up for viewing. It’s free to!
How’s that for a topic out of left field, never before seen on my blog. VMWare! Well, I got wind that WMworld sessions are available to watch for free so I just wanted to spread the word. All you need to do is create an account, you can find the sessions here. I’ll say It’s nice see vendors continue this trend, Cisco is already doing that with their CiscoLive365 site.
CCNP Exam update coming soon.

Looks like the Cisco Certification team has been busy lately, earlier this year the CCNP: Security track got an update and recently an update to the CCNP: Route/Switch was just announced. Before you get too worried if you are currently studying for the current exams, you have until January 2015 before the current exams get retired. So you still have plenty of time to study.
To highlight a few of the changes:
Route v2 300-101:
- Much more IPv6 related topics.
- The introduction of DMVPN
- CEF Concepts
- Various security technologies
Switch v2 300-115
- Stackwise technologies
- Removal of VoIP, Video, & Wireless topics
- L2 Security technologies
TShoot v2 300-135
- Mixture of the new Routev2 & Switchv2 Technologies.
Looks like the newer CCNP: Route/Switch objectives are really going to focus on routing & switching technologies and less on other networking technologies. These new objectives also line up closer with the new CCIEv5.
Now, I took the older CCNP exams (the old ONT, ISCW, BCMSN, BSCI) but it is interesting to see how these exams grow and evolve over time. I will definitely say I am surprised to see the removal of Wireless, Voice, & especially QoS from the CCNP: R/S exams. While I understand the CCNP: R/S should focus on well Routing & Switching, I also think it is important for engineers know of these other technologies especially QoS.
What do you guys think?

