Archive for the ‘Cisco’ Category
Enter the ring: Engineering Deathmatch!!

What happens when you combine the old celebrity deathmatch meets Cisco networking? Well, you get Engineering Deathmatch! Two engineers enter the console and only one gets out! (You’ve seen Tron right!!?)
Well….. it’s almost that dramatic. Have you ever wanted to go head to head against a fellow engineer, put your wits to the test, and see who can fix the network quicker? Engineering Deathmatch let’s you do just that. I went up against Daniel Dib and while I did not arise victorious it was a still a very fun scenario! Major kudos and props to a good friend of mine Jon Major (pun intended) for building out the crazy scenario that had both Dan and myself stumped for quite some time. It certainly wasn’t your typical network mis-configuration.
I really do recommend this deathmatch to anyone looking for a good challenge, regardless of your level (CCNA/CCNP/CCIE) or your networking interest (Collaboration/RouteSwitch/DevOps) there could be a deathmatch with your name on it! Especially if you got a good co-worker, friend, or study buddy who doesn’t mind some friendly competition.
I know I’ve been quiet for a bit lately, but now that I’ve gotten a few things in order I’m coming back!
(Now, to tackle all those drafts that have been piling up)
Till next time, happy hunting.. I mean labbing!
VN-Tag you are becoming more maintstream.
VN-Tag, typically was a technology only seen in the Data Center (When using Nexus 2000 series FEXs) however this has started changing. If you check out Cisco’s new 6800’s series Catalyst switch you’ll see they are now pushing a new ‘instant access’ model. This new model allows us to deploy ‘dumb’ switches that are centrally managed by the main 6800 Chassis essentially making those switches act as ‘external linecards’. Now in the Data Center this is nothing new, sounds just like the Nexus 2000 Series Fabric Extenders (FEX’s) right? Well, they are a little more similar then you think deep down. VN-Tag is the technology used by Nexus 2k FEX’s with their upstream parent switch, that same VN-Tag is also being utilized in the Cisco 6800 Series with its downstream external switches.
The VN-Tag technology itself simply adds an additional header to the packet as it traverses between the ‘Instant Access’ (Or FEX) and the it’s parent switch, where all the switching occurs. It is important to call-out the ‘Instant Access’ switches do NOT do any local switches (once again just like Nexus 2k FEX) all the information is forwarded up the 6500 or 6800 chassis where the packet will get switched or routed accordingly.
Let’s take a quick look at the VN-Tag information itself:

Surprisingly it’s nothing more than an additional 6-bytes. The fields are as follows:
- EtherType [16-bits] = 0x8926
- Destination Bit [1-bit] – Indicates which direction the frame is flowing.
- Pointer bit [1-bit] –
- Destination VIF – [14-bits] – Identifies the destination port.
- Looped – Identifies the source vNIC, ment to identify multicast frames to ensure it is not forwarded back to where it originated.
- Reserved [2-bits] – For future use.
- Source VIF [12-bits] – vif_id of the downstream port.
- Version [2-bits] – Set to 0
Expanding the VN-Tag to products outside of the Nexus line is definitely a great move, and it definitely has great use-cases in many large enterprises that want a more consolidated approach for management, after all this easy way to cut down on your Layer-2 spanning-tree topology. You can also cut down on configuration/implementation time, since this technology allows you to pre-provision the ports on an Instant Access before it is actually connected to the chassis.
Additional Info:
Cisco Instant Access White Paper
P.S. – This was a blog post I had start middle/late last year when the 6800 & Instant Access were first announced. Finally got around to finishing it better late than never right?
Reboot & update your router in half the time with warm reloads!
Reloading a router can sometimes feel right like an eternity, usually when you issue a reload you can step away get a cup of coffee sit back down and the router should be just about be ready. For quite a while now (well since before 12.4 which lets admit is a long time ago) we’ve had to ability to ‘warm’ boot Cisco routers and cut the reload time in half! The first question we probably ask, is what exactly does the router do differently to decrease the time it takes to reload? Well, When you want a router boot, what is one of the first things you see it doing? Usually you see the router reading the flash card, grabbing the IOS and decompressing it into RAM, when you enable the warm reload feature the router skips this steps because it keeps this information in a reserved portion of memory.
This was the best graphic I could that provides a visual explanation of the process. A powerpoint from Cisco in 2004:

Showing the a warm reload skipping the load & decompress process and starting right at the initialization process.
What’s even better about this feature, is how easy it is configure. This feature is enabled with a single command:

There a few caveats you want to keep in mind when configuring this command:
- As mentioned after the initial configuration of the warm reload you need to initiate another reload of the router before the feature really becomes active.
- The count is the number of times you can perform a warm reload before you must perform another cold boot.
- uptime is the amount of time the router must online in between warm reloads this means you can sit back and continuously warm reload a router as soon as it becomes available.
- When you want to perform a warm reload you must specify the keyword warm after the reload command. (see example below)
You can verify the configuration with show warm-reboot:

Prior to reload after configuration
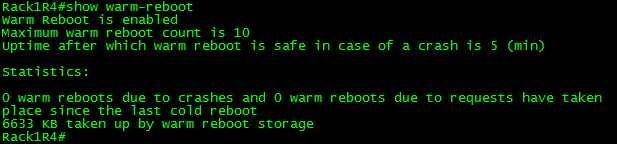
After the reload once the feature is enabled.
Performing a warm reload:

Don’t the keyword ‘warm’
This was the initial reload:

Reboot took 170 seconds!
Almost 3 minutes!
This was a warm reload:

1 minute & 10 seconds! Much quicker!
Now, what I think the best part of this feature is, is the fact we can use warm reloads to stage IOS updates, because let’s face it how many often do we decide to just randomly reboot Cisco routers! This process works in a similar fashion, the router will actually load & decompress the new image prior to going down, saving time.

This is done with the following command:
-Unfortunately I was unable to successfully do this, looks like more trusty old 1841 just couldn’t do it with IOS v15.

Now, if only we could get this feature in NX-OS, when you reboot a Nexus you can forget about the coffee, hop in the car and get a pour-over from Starbucks come back, and you might still be waiting.
Routing on a Cisco 2960 Catalyst Switch!
Yep, you read that correctly. You can now route on the low-end layer 2 Catalyst 2960 switches (Sounds like one bad oxymoron right?). This feature was introduced in IOS 12.2(55) and requires LAN Base which has been around since late last year, however it is not a very known feature which shocks me! I figured the addition of routing (Albeit limited routing functionality) on a 2960 switch would have been some great news!
Now don’t go expecting to run OSPF or EIGRP on a 2960, in fact it does not support any routing protocol, so your natural reaction is going to be then what is the point? Well it supports inter-vlan routing and up 16 static routes. Remember one of those static routes can be a default route up to a distribution switches’ HSRP address (or VSS Core) allowing you to implement a routed access layer for cheap!
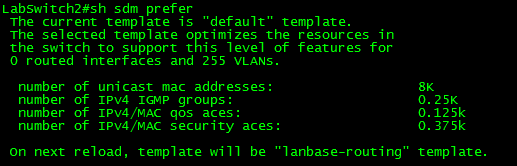
Now in regards to the configuration, once you have 12.2(55) or newer loaded on your 2960 you will need to make sure the switch is running the proper SDM (No, not Security Device Manager for those that are unfortunate to remember it) Switching Database Manager. If you are not familiar with the SDM templates on Catalyst switches they are definitely worth a look at it, especially since the SDM template instructs the switch how to curve up resources to the TCAM. (IE: Mac tables, routing tables, unicast/multicast, QoS, etc -Obviously not all of those pertain to the 2960). The Catalyst 2960 now has the option for ‘lanbase-routing’, which is the SDM we need to enable.

Show sdm prefer – to see the active SDM template in use.

Changing the SDM Template to ‘lanbase-routing’
Note: When we change the SDM the switch requires a reboot for the new SDM template to take effect because it changes the resources allocated by the TCAM.
If you change the SDM and do not perform a reload your changes will not take effect and if you issue sh sdm prefer again the switch will tell you which SDM the switch will load upon next reload.
Ok, now that we have the proper SDM loaded on the switch (lanbase-routing) we need to enable ‘ip routing’ on the switch:
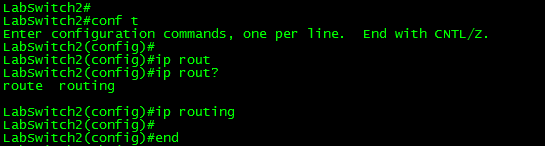
Now, that ‘ip routing’ is enabled we can go ahead and view the routing table of the Catalyst 2960!

Check it out!! A routing table on a Catalyst 2960!
Now, there you have it routing on a Catalyst 2960 the important thing is to remember the limit of 16 static routes. So I put this to the test and added over 20+ static routes:

I placed 22 routes into configuration mode and after #16 the switch silently discarded the rest of the routes. Something else I found pretty interesting is the fact my other VLAN interface disappeared from the routing table (172.16.1.0 /24 which is in the previous screen capture, which is a connected route!) So this feature really is limited but it is there none the less.
In this post I was running 12.2(58) on one of the 2960 switches in my lab C2960TT-L I believe, I was able to place a client one vlan and ping across to another two VLAN attached to the 2960 with no other routing device in the path.
NOTE: WordPress is distorting my images so until I figure out why, all the screen shots in this post are meduim/thumbnail size and can be viewed in full size when clicked on.
Cisco Express Forwarding – CEF
In my last post about unicast Reverse Path Forwarding, I made quite a few references to CEF. CEF (known as Cisco Express Forwarding) is a feature built into every Cisco router and is enabled by default it’s really the feature that makes Cisco well Cisco. I figured I would take a little time and discuss CEF in a little detail.
From a 500 foot view CEF is a method the router uses to forward packets, without utilizing any CPU cycles. CEF builds 2 cached tables in memory, these 2 cached tables are built from every entry in the routing table. So when the next packet arrives the router simply looks up the CEF entry found within memory to forward the packet, compared to sending the packet to the packet to the CPU for a route lookup and then forwarding the packet on.
CEF works by creating two tables:
- The Adjacency table maintains the layer 2 forwarding information for each FIB entry eliminating the need for the router to send out ARP requests.
- The FIB (Forwarding Information Base, also known as the CEF table) contains information from the routing tables and tracks the next-hop for all routes. So where the adjancency table manages layer 2 information the CEF table manages the layer 3 forwarding information
Now that we know the components of CEF, lets talk a little about how CEF interacts with packets as they enter the router.
- Once the packets arrives at the router the layer 2 information is stripped off. (This is normal and happens whenever a frame is accepted to a layer 3 device)
- Next the router looks up the destination using the CEF table.
- Then the router finds the corresponding adjacency table entry.
- The router then adds the corresponding layer 2 information (found in the adjacency table) back to the packet and forwards the packet on. All from memory.
You can view the CEF table by issuing the command sh ip cef:

Now remember the CEF table is layer 3 information so we have destination prefixes and what the next hop address is along with the outgoing interface.
You can view layer 2 adjacencies by issuing the sh adjacency %Interface% detail:

Since the adjancency table pertains to layer 2 information we’ll see some MAC addresses here, one thing I want to point is that long hexidecimal number in the fifth line that line consists of the destination MAC address of 10.1.1.2, the source MAC address of this routers fa0/0 interface and the ethertype of 0800 (Meaning it’s an ethernet interface)
Now this was only the tip of the iceberg for CEF, and this post was only supposed to bring it to light on a real high level so more CEF related posts will mostly surface as time goes on.
Scheduling router jobs utilizing Kron policies.
Another very nifty feature that is part of every router (along with Unix system) is the ability to run and schedule Kron jobs. The next question is what can you use these kron jobs for, well you can use them to run privileged level commands on a scheduled basis.
A few examples:
- Let’s say you want the router to automatically send it’s config to a TFTP or SCP server, create a kron job that will do just that on a weekly basis.
- Create a kron job that will write the running-config to memory so you don’t have to run the risk of losing your current configuration in the event of a power failure or router reboot.
- Set a kron job to run on a nightly basis and issue the undebug all command to prevent someone from letting a debug run rampant.
- The possibilities are almost endless.
Something to keep in mind however is the fact kron jobs cannot be used to make configuration changes, kron cli commands are submitted at the privilege level individually and because they are submitted individually you cannot nest commands to issue commands in global config mode. (You will want to look for a macro for something like that)
Now lets look at what we need to do to create and schedule a kron policy for a Cisco device:
- Create the kron policy.
- set the commands that are to be issued by the kron policy.
- Create the kron occurrence policy.
- Specify the re-occurrence schedule.
- Specify which kron policy to run under the occurrence schedule.

Setting up a kron policy
Setting the kron policy schedule.
The router will also tell you if the clock is not configured, as you could guess if the date/time on the router is not configured correctly scheduling the kron job could be difficult.
You can view the kron schedule by issuing the following command: sh kron schedule

Viewing the kron schedule
I’ve created a second schedule to run every 2 minutes to the sake of my own time.
You can also debug the kron job to verify it is running successfully: debug kron all

Kron debug output.
From the debug output you can see the router call the kron job, issue the command in the kron policy, delay the kron job another 2 minutes, and in this case you can see the router write config to memory.

