Posts Tagged ‘CCIE:R/S’
Private VLANs when, where, & how.
Recently PVLANs came into a design discussion, which in turn led into me reminiscing on my Route/Switch days. So naturally when I wanted to re-visit the topic if anything to make sure I still remembered everything what was important and to see if any features have been added with the new IOS’s. It’s been a while since my last PVLAN deployment so here we go!
Terminology:
- Promiscuous Port – This is the ‘primary’ VLAN that can communicate with all the other Isolated & Community ports with the PVLAN environment.
- Isolated Port – This is a ‘secondary’ VLAN that will only communicate with the ‘primary’ promiscuous VLAN. Isolated ports cannot even communicate with other isolated ports. Since we are talking about VLANs, communication is blocked at the Layer 2 perspective. (At which layer do VLANs operate at, Layer 2)
- Community Port – This is another type of a ‘secondary’ VLAN, like Isolated ports a community port can also communicate with the ‘primary’ promiscuous VLAN. The big difference here is that a port configured in a ‘secondary’ community VLAN can also communicate with other ports configured as community ports. They will not however be able to communicate with ports configured in an ‘isolated’ VLAN.
Traffic Flows:
Since these Private VLANs operate at layer 2 it is worth pointing out some specific traffic flows, after all it is worth considering the implication of this isolation and typical broadcast/multicast flows:
- Broadcast Traffic
- The promiscuous port will forward broadcast traffic to all isolated & community ports. (Including trunks)
- The Isolated port will only forward the broadcast to a promiscuous port. (Including trunks)
- Community ports will forward broadcast to the promiscuous & other community ports. (Including trunks)
Configuration & Topology:

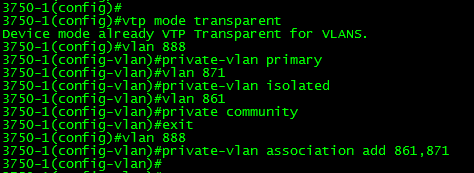
- The configuration is not too bad, you’ll notice the first thing we do is set the VTP to transparent mode. If you are running VTP v1 or v2 this needs to be done.
- Next we create a VLAN like normal, however under the vlan configuration, we set the PVLAN mode. Here we are setting VLAN 888 to be a ‘primary’ promiscuous VLAN.
- Next we create VLAN 871, and designate it as a ‘secondary’ isolated VLAN
- Followed by us creating VLAN 861, and marking is as a ‘secondary’ community VLAN.
- Once we finished creating our ‘primary’ & ‘secondary’ VLANs we need to associate our ‘secondary VLANs’ to our ‘primary’ VLAN.
To re-cap, we set the VTP mode to transparent, created and assigned out promiscuous VLAN along with creating and associated our isolated & community VLANs, not too bad right?
Now that our VLANs are defined lets map these Layer2 private VLANs to a Layer-3 SVI:

So there, we created the SVI for VLAN 888 (The primary VLAN) and we associated the ‘secondary’ VLANs to the SVI with the private-vlan mapping add command. You’ll also notice the system message stating that our mapping was successful.
Now, that we have Layer-3 mapping lets go ahead and assigned a few ports to our private VLANs.

Here we, enter interface fa1/0/20, set the switchport mode to private-vlan host and configure port 20 to be an isolated port. (By placing this port in the isolated PVLAN)
Port fa1/0/21 on the other hand is configured to be in the ‘community’ VLAN.
Next, we are going to configure Port Fa1/0/22 to be a promiscuous so it can communicate with ports in both VLAN 861 & 871:

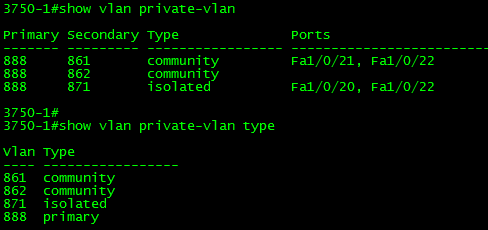
Verification:
Verifying the PLVLAN configuration is simple enough:
show int private-vlan mapping – Verify your Layer2 to Layer3 mappings

show int switchport – Verify Layer2 switchport parameters

show vlan private-vlan – Verify PVLAN setttings & ports.

