Management Toolkit: SMART Goals
In the last post we discussed Management vs Leadership, now let’s start getting into some useful tools, traits, and behaviors for both managers and leaders. Starting us off will be SMART goals. SMART is an acronym for Specific Measurable Achievable Realistic and Time-based. Once you hear about SMART goals and what SMART goals represent it sounds so obvious: of course goals need to be realistic and achievable, they have be measurable. If they can’t measured how can you gauge progress and feel a sense of accomplishment when you have reached a certain milestone?
As obvious as SMART goals sound it is something that can be easily overlooked when you are handling a large-scale project or fast-paced environment. We may get caught up in the moment or during a meeting, a new blocker was discovered or timelines were changed these things may catch us by surprise and we need to react quickly. As everyone starts to react tasks and goals are assigned with alacrity to address these new challenges.
As a manager you get to know your team and peers, you know what everyone is capable of. While you as the manager reacted and assign items did you assign SMART goals or did you just assign a task that you know your team can handle? This is how easy it is to overlook SMART goals. Next up, we’ll go over some examples of SMART goals. As mentioned in my previous post, I have a background in IT Network Engineering, the following example with be focused on network engineering.
Please configure those switches
Here we have a very basic task or goal to configure those switches. This doesn’t seem very SMART.
- Specific – This task does not the specify which switches we should configure
- Measurable – There is nothing to measure progress, how many switches need to be configured?
- Achievable – The task does not provide any insight on how achieve success or what success looks like
- Relevant – Context is not provided, there is no mention of why this task is important or why it needs to be completed
- Time-based – No timeline, deadline, or start time is mentioned how do we know when this is supposed to be completed by?
Even though the original ask seems like a simple task it leaves out of important details and these important details are the difference between success and failure. Now, let’s see what we can do to make this SMART.

Specific – Where can we include more specific information and details to properly identify what needs to be done, this is helpful because it answers follow-up questions like ‘Which switches?’ or ‘What location are they going to be deployed at?”
Please configure the new HPE Aruba CX 6300M switches for the new Contoso building
In our updated ask here, we specify what switches are to be configured:
- The new HPE Aruba CX 6300M switches
We also specify where in the network these switches need to be deployed allowing us to configure the switch properly for the unique location.
- The new Contoso building
This is an improvement but let’s continue to make this even SMARTer

Measurable – How will we measure the progressing and success of this task or goal?
Please configure the 16x new HPE Aruba CX 6300M switches for the new Contoso building
Next, we specify a quantity of switches that needs to be configured. (It’s never usually just one right?)
- The 16x new HPE Aruba CX 6300M switches
Now, that we have specified a quantity we can measure progress. This is great for the following reasons:
- We can forecast and plan for the completion of this task or goal – It takes X amount of time to configure one switch or switch stack
- We can properly offer status updates – Y of 16 are completed
- Now that the task is measurable we can determine if timelines aligns with the task or goal
Lets see how else we can improve this:

Achievable – How can we help make this task more achievable? What guidance, recommendations, extra information can we provide to make sure the person who is assigned this task or goal will be successful?
Using our standard templates, please configure the 16x new HPE Aruba CX 6300M switches for the new Contoso building.
Advising on how the task should be performed provides direction and also sets expectation. After all we need these switches (or this task) completed in a certain way if the task is not performed the way we are expecting then success may not be achieved. It is the managers role to ensure expectations are set and that the ask is properly understood. Communication is key and you must strike a balance between communicating too little and communicating too much, but we must communicate enough to set our team up for success and to properly accomplish a task or goal.

Relevant – Why is this important? It is good to emphasis the value of performing tasks or goals, people want to know that their work has meaning. If someone does not feel like their work is important or impactful than that may affect their outlook on the task or goal. Nothing is more dis-empowering or de-moralizing than putting a worth-while effort into a task only to find out the effort was for nought and work gets cast aside never to be mentioned again.
Using our standard templates, please configure 16 network switches for the new Contoso building. We need to provide network access to go-live at the new warehouse which is expected to increase our yearly profit by 20%.
Here our message was updated once more, not with details about how to accomplish but more background information and context. We now know why we need to configure these new switches. These new switches are part of larger project to activate a new warehouse for the business. This new warehouse is expected to have a large and positive outcome for the business as a whole.
As manager it is important we keep our teams updated with the wider vision of the business. The team needs to know that their work is important and directly affects the business (either positively or negatively). All too often on the IS / IT side we hear about “The business” sometimes we know what that means, sometimes it’s an unknown mysterious group in a conference room somewhere. The more transparency that exists between the business and IT goals the more efficient both parties can be in delivering success.

Time-based – Setting a timeline for a task or goal helps set expectation. If expectations are not aligned each party will define their own independent expectations and timelines which may or may not align with what is considered success.
Using our standard templates, please configure 16 network switches for the new Contoso building. We need to provide network access to go-live at the new warehouse which is expected to increase our yearly profit by 20%. The switches need to be configured and installed within the next 14 days, status updates are due every 2 days.
This tells us when the task or goal must be completed by and how often we need to communicate updates, allowing the to team stay up-to date as progress changes. Frequent updates are important because they allow the team to stay in-sync and if anything does change those changes are communicated promptly and plan is adjusted.
There we have it, a SMART goal it’s fair to say that the goal changed quite a bit over the course of this post:
Original: Please configure those switches
—–
SMART: Using our standard templates, please configure 16 network switches for the new Contoso building. We need to provide network access to go-live at the new warehouse which is expected to increase our yearly profit by 20%. The switches need to be configured and installed within the next 14 days, status updates are due every 2 days.
Quite a difference right? It’s easy to see which goal or task brings with it a better chance of success. This then begs the question, does every task need to be ‘SMART‘?

Well that depends, as a manager you need to know your team. The SMARTer your goal is the better chance of success it has but I will be the first to admit not all my assigned tasks or goals are SMART. I’ve worked on many teams with many different individuals at varying skill sets, depending on the skill set of that individual my ask might be SMART or might not be SMART. Something we might cover in a future post is Situational Leadership, the task I am assigning to a team member is he a D1 or and D4? The answer to this question will affect how SMART my goal is. There are some teammates that I have worked along side with for years, they know what I am looking for and in those cases goals or tasks might be different than for let’s say for someone I have never worked with before. Use SMART goals at your discretion, when in doubt maybe air on the side SMARTer goals to ensure the ask is clear and expectations are set.
Times have truly changed here we are talking about configuring HPE Aruba switches, management, teaming, and situational leadership we’ve come a long since my first post talking about the 1 Step Router Lockdown feature in the Java based Cisco SDM tool (anyone remember that tool?)
Leadership vs Management
Leadership and management these two are often used interchangeably but are they interchangeable? Do we consider all managers to also be leaders and are all leaders managers? While the best managers will have traits of a good leader and visa-versa these two roles are not always synonymous. First thing we will want to do is to look at these roles individually and understand what the goal is each of these roles and how these roles interact with those around them.
Managers and Management
Management tends to a fluid role filling gaps as needed to make sure objectives and goals are met. In order to make sure goals are met managers often need to do following:
Planning: Since manager’s are tasked to accomplish a task within a certain timeline, resources, budget, and other constraints managers must have to ability to sit down and consider the tasks that have to be performed to accomplish the goal. These tasks also have to be accomplished within a certain time-frame and budget. This where you need to start answering the questions:
- What steps need to happen in order to complete the tasks?
- How much time does each step take?
- How many tasks can be executed in parallel?
- Which steps incur the most risk?
- How can address each risk?
- Are there any holidays, blackout days, or vacations overlapping with the schedule?
- Can the team maintain the pace required for duration of the task / project?
- Along many more questions..
While larger and long-term tasks / projects may have a dedicated or team of project managers, each manager is usually assigned or responsible for a particular domain which requires that manager to have deep understanding of their knowledge domain in order to deliver and plan for success.
Maintaining control and rationalizing: This can be a tricky one, as managers are responsible for delivering value to the business within the agreed upon timeline and budget a certain level of control must be maintained. Balancing how much control is required over the given situation without crossing a line is where it gets tricky. Managers that maintain too much control come off as micro-managers where-as having too little control are accompanied by its own set of issues. Some challenges includes:
- Maintaining progress to meet dealines
- Confirming people are where and when they need to be
- Staying ahead of gates, blockers and issues
- Operating within a budget
Setting goals and developing the team: As managers you are typically managing people and when you are managing people it is important to make sure goals and a progression is defined. Most people want to be challenged so that they can continue to grow.
- Where does this team member see themselves in the future?
- Is there a development plan to support this team member meet his future plans?
- Is the goal clearly defined and understood by everyone involved?
When it comes to goal setting and development plans there are many different things to consider these are just a couple of points (Maybe we will cover this more in a future post).
Leaders and Leadership
Where managers are focused on the objectives, the team, and delivering to the business; leaders on the other hand tend to be focused on a longer term impact to the business: developing a vision, inspiring new ideas and creating change while empowering those around them.
Motivate and Inspire: As a leader you want to provoke new ideas and out-of-box thinking, the best way to accomplish that is to inspire and motivate those around you.
- Brining a good energy to the team, room, or meeting
- Making sure everyone has a voice and is able to bring their ideas to the table
- Create a space that these ideas can be presented without fear or criticism, ridicule, or negativity
Ethical Champion: In order to empower and align those around you as a leader you must be trust-worthy and act with integrity. As you develop a rapport with those around you, your actions will convey your intentions and if your intentions / ethics are questionable you may find that people may not be upfront with you and if the team can’t be upfront with you then their will struggles in realizing and gaining support for a long-term vision. Leaders are those people that people may turn to when they hit challenge. Think about, the last time you hit a tough spot who did you turn to? Do you always report to a you direct manager or is there another peer you turn to for opinions, why do you go this person?
Setting a direction: Leaders are usually looking ahead toward long-term goals, these may involve changes to corporate culture or technology.
- Building on the last two sections, as leaders gain the trust of those around them and continue to motivate / inspire those around they are able to influence the direction forward. Now, Influence can be good or bad, in the association of leadership we assume this influence is designed to be positive. After all our leaders are ethical and looking for the best interest.
- When you are trying to change direction, you need to involve those that will be impacted by change. Soliciting ideas and inspiring the team come up with creative ways on how they can be a part of the upcoming change and how can the upcoming change be accomplished. This allows the team to be part of the vision allowing more people to buy in to the idea thus improving your chances of success.
I’ll provide a couple links below to two different podcast. These are podcast I have been subscribed to for many years now, one is focused on management and the second focused on leadership. I found these very insightful as they cover many different aspects of management and leadership:
The Look and Sound of Leadership

Long time readers will know my background originates from IT engineering, specifically network engineering. These leadership and management tid-bits are from my first hand experience, I do not have a business degree. Feel free to drop a comment to provide your thoughts and insight.
Wireshark tid-bit: Looking for the smoking gun
It’s not always the network which is at fault but it is usually the network that is the assumed culprit. Wireshark can be a vital tool when troubleshooting difficult scenarios or prove that the network is not root cause. The purpose of this post is to ask questions and promote out of the box thinking when troubleshooting with Wireshark. Some common problems:
- The network is slow / This file transfer is slow
- My application responds after X seconds
- This application or agent is not working
These are very broad problem statements and depending on how familiar you are with the configurations and infrastructure, these can sound like daunting tasks to troubleshoot. At least until we start asking more questions and begin gathering the information we need to start troubleshooting. On occasion it is easier to capture packets on the source and destination endpoints then see what the packets tell us, will the packet capture align with the problem or will the packets point us in another direction?
When using Wireshark to troubleshoot such a board and undefined problem, where do you start? Wireshark is great at collecting details, Wireshark also presents all this information to us in an organized and digestable fashion. It’s up to us as network professionals to solve the mystery. Next up we’ll discuss some key items that will help expedite the troubleshooting process and make you more comfortable performing and reading packet captures. We will also ask some thought provoking questions to involve not just network-related technologies and issues.
Capture points and filtering options
The capture point is the foundation of your upcoming analysis. If you are not capturing at the correct spot (or spots) any future protocol analysis will either make the troubleshooting process more difficult and time consuming or you may find yourself going down the wrong path. It is always a good idea to review and understand the traffic flow which you are troubleshooting. Then ask yourself, will traffic be passing through my capture point? Could this traffic flow take another network path? Could another technology such as Virtual Port-Channel (vPC), Virtual-Chassis, load-balancers, load-sharing, ACLs (it can become quite a large list) be causing traffic to flow in another direction or drop the traffic flow all together? Depending on the size of the infrastructure is it possible to walk the path of the packet, following MAC, ARP, and routing tables?
Capturing at the right point is half of the battle, the next big question is what kind of capture filter do you need? Should you just capture everything passing through the interface in question? Some items to consider:
- If you perform an unfiltered capture and capture all the details:
- Will you create a performance bottleneck? Packet capturing can be resource intensive impeding network performance for production traffic flows.
- Will the packet capture be usable? The larger the packet capture the more time it takes to filter and analyze. You need to start filtering the conversation at some point either pre- or post- capture. Having all the data is great but will it be helpful?
- If you do decide to filter your capture what is your criteria?
- Source and Destination are always valuable but will that show you the entire picture? Will you see DNS resolution? Do you need to be aware of any HTTP redirects?
Timestamps
Being mindful of the timestamps logged in a packet capture, this information can help identify a wide array of different issues. Wireshark captures multiple timestamps, like almost every other field in the packet you can turn that field into a column this allows you to quickly identify gaps in time. You can take this a step further by marking a ‘reference’ packet allowing you to see the time delta from the reference packet. This can be useful when determining how long a requests takes or how long it takes a TCP handshake to complete.
e.g.: Why did the application server take 32 seconds to start transferring data? What was occurring during that 32 second gap? Perhaps there was a delay in receiving traffic from a backend database? Did you capture the backend flow too? Typically when a database is waiting on a transaction to complete you may see ‘keep-alive’ packets allowing the TCP connection to remain open/active while backend tasks are being performed. If you are troubleshooting a performance issue and see ‘keep-alive’ packets your next step may be to understand why the request is taking so long. Continuing with the database example, does a query need to be updated? Is the database fragmented? Does the server need additional resources (CPU/Memory/Disk/etc)?
Source and destination details
Don’t discount the source and destination details of the conversations. These details allow you to confirm the traffic is flowing the way you expect it to be going.
- MAC address – Does the source and destination MAC addresses line up with the expected network interfaces? Could the traffic be going a different path? Is there a misconfiguration causing traffic to flow over a different interface?
- I have seen colorful packet captures when LAG is enabled on the server-side but not on the network side. (This was not 802.3ad LACP)
- Dot1Q and IP details – Are you seeing the expected VLAN tags? Are any device dual-homed on multiple networks and could traffic be routed over an unexpected or different interface?
A packet capture can clearly show you what is happening, once you see what is happening you can then ask the question: Why is this happening? e.g.: A device receiving a packet on one VLAN but the response is received on a different VLAN, why is the response appearing on different network than which is was received?
Firewalls for instance allow you see packets getting ‘dropped’ or hitting the ‘bit bucket’, if you capture on both the rx and tx you expect to the see the same Dot1Q information, however if you find packets in the drop log with a different Dot1Q header than expected you can assume asymmetric routing and that may lead you to your root cause.
IP and TCP Options:
IP and TCP options provide an abundance of information about both the endpoints and the conversation:
- IP Length – The size of the packet can help identify packet loss involving MTU and fragmentation related issue.
- Fragmentation – What is the status of the DF-bit? Are overlays in play? How about Jumbo frames? Do you see certain packet size being transmitted from the source but not arriving at the destination? Do you need to move you capture point to identify the source of packet loss?
- Window Size and MSS – Much less a problem these days but does the TCP session have the appropriate TCP MSS and Window size are these setting being manipulated by a load balancer?
- IP Identifier – The IP ID field can be invaluable in the right scenario, especially when troubleshooting switching loops, routing loops, or even software bugs. I’ve done a previous write-up of the IP ID field and therefore won’t be going over the details again but I recommend giving it a quick read before finishing up here.
TCP Flags:
How is TCP behaving? Are you seeing the entire 3-way handshake? Besides capturing at the proper locations you also want to make sure your timing is correct, starting your capture before handshake occurs is vital to understanding the whole picture. The TCP handshake will include items discussed in the previous section such as the Windows Size and MSS, following the window size of a conversation may provide insight into packet loss or buffer issues on one of the endpoints. How about RST packets? It’s important to understand the application, some applications may not be coded properly and rely on RST packets to end connections as opposed to graceful closures with a FIN / FIN+ACK handshake. The last thing you want to do is go down the wrong path and assume something is wrong when it is indeed working as intended. (it may not be optimal but it may be as intended)
Protocol Dependancies
I briefly touched on this earlier in the post, it is good to see the full picture and follow the application / process in its entirety for example:
- When troubleshooting a connection issue are you are capturing the DNS resolution too?
- If you troubleshooting IP Storage or IP File access are you seeing any Kerberos or ticket authentication?
- Are you seeing a successful TLS handshake if you are working with a secure connection?
- In a security-conscience world do you see the RADIUS communication when troubleshooting device onboarding issues?
This post asked a lot of questions, as mentioned at the start this was aimed to provoke that out-of-the-box thinking: Am I troubleshooting this properly? Am I looking at the right pieces? Is there more to this issue than what I am considering? Hopefully some of these questions and examples did just that. I have other Wireshark posts on this blog, many of which are still valid after all these years, some stand-out ones to assist with troubleshooting:
As always, happy hunti…I mean troubleshooting!
As you can tell by my typos, grammar, sprinkled in references, and humor this post was written without the help of Artificial Intelligence (AI). These are my loosely organized ramblings.
Network certification for Microsoft Azure

Update 1/17/2021:
I successfully passed the AZ-700 just a few days ago. Summarizing my study plan:
- I started with the Microsoft free online self-paced learning. This acted as my primer for the topics and technologies. Then reading other KB articles as I needed to better understand certain topics and to better differentiate certain features. (IE: Service Endpoint vs Private Endpoint or the different load-balancer options)
- My studies were supplemented with a Udemy course by Alan Rodrigues. I liked this course due to the amount of ‘lab’ videos where you can see Alan build out the solutions. Only downside is that lab videos can be repetitive, I feel that some creation tasks could have been skipped or fast-forwarded.
- When applicable I watched deep dive videos from John Savill’s AZ-700 playlist. These videos are fantastic and go into great detail for managing production environments.
Overall, it was a good exam the exam objectives does a good job summarizing the covered topics. This being my first Microsoft exam in over 10 years understanding the format was about as challenging as the material itself. I do recommend this material for any network engineers that need to work with Azure networking. This exam is great for understanding the different technologies, terminologies, and how they relate to the different resources in Azure.
Original Post:
Microsoft recently (well, maybe a couple months ago at this point) released a new certification focusing on the networking aspect of Microsoft Azure. This provides a great primer to get familiar with the Microsoft cloud from a connectivity perspective especially for those out there who are responsible maintaining cloud connectivity for Azure. The exam is broken up into the following categories:
- Design, implement, and manage hybrid networking (10-15%)
- Design and implement core networking infrastructure (20-25%)
- Design and implement routing (25-30%)
- Secure and monitor networks (15-20%)
- Design and implement Private access to Azure Services (10-15%)
The exam code is AZ-700: Designing and Implementing Microsoft Azure Networking Solutions and costs the normal $165 USD. A further breakdown of learning objectives can be found here. The exam syllabus and objectives look to cover a great array of Azure networking topics:
- VPN Connectivity – Both Site-to-Site customer locations and Point-to-Site for remote users
- Connectivity leveraging ExpressRoute & VirtualWAN
- Creating and connecting VNets along with the different ways to accomplish VNet routing
- Deploying Network Virtual Appliances (NVA), load-balancing, & NAT
- Security concepts are introduced as well: Network Security Groups (NSGs), Web Application Firewalls (WAF) and how to monitor/monitor these security features
- Leveraging network watcher for monitoring & logging
A wide array of topics for being able to talk-the-talk and crawl-the-crawl of Azure networking (Not quite walking yet if this your first tango with Azure)
What makes this even more exciting is that Microsoft was kind enough to consolidate many different articles into a free online self-paced learning program with over 8 hours of recommended reading covering the topics directly from the exam syllabus.
A colleague introduced me to another great resource for learning about Microsoft Azure: John Savill’s YouTube channel. There he has created a dedicated playlist for the AZ-700 with many great videos. Including a 3-hour video dedicated to the AZ-700. There is an hour and a half video deep diving into the Azure firewall & another video deep diving into Azure ExpressRoute. I highly recommend this YouTube channel for anything Azure related. (Networking or otherwise)
These are resources, that I wish I knew about a couple years ago when I started working with Azure but I didn’t. Now that I do however, I am going to do something I haven’t done in over a decade study for a Microsoft certification.
Happy hunting.. Wait no happy labbing.
The TOGAF ADM – Part II
Continuing right off from my last post, we going to continue our run-though of the ADM wrapping the last few phases.
Phase E: opportunities & Solution: Now, it’s time for us to review the outputs from our previous phases and to start defining the beginning of our implementation details. We do this in the form of creating the work packages, transition architectures, and architecture roadmaps. We have collected a lot of information in phases A through D on top of reviewing all this information we now need to start consolidating it.
Key steps in this phase are:
- Review & consolidate the gap analysis from phases B-D
- Review & consolidate the requirements across the business functions
- Review & reconcile interoperability requirements & dependancies
- Confirm readiness & risk for business transformation
- Build you implementation & migration strategy, identify major work packages & transition architectures
- Create architecture roadmap & implementation and migration plan.

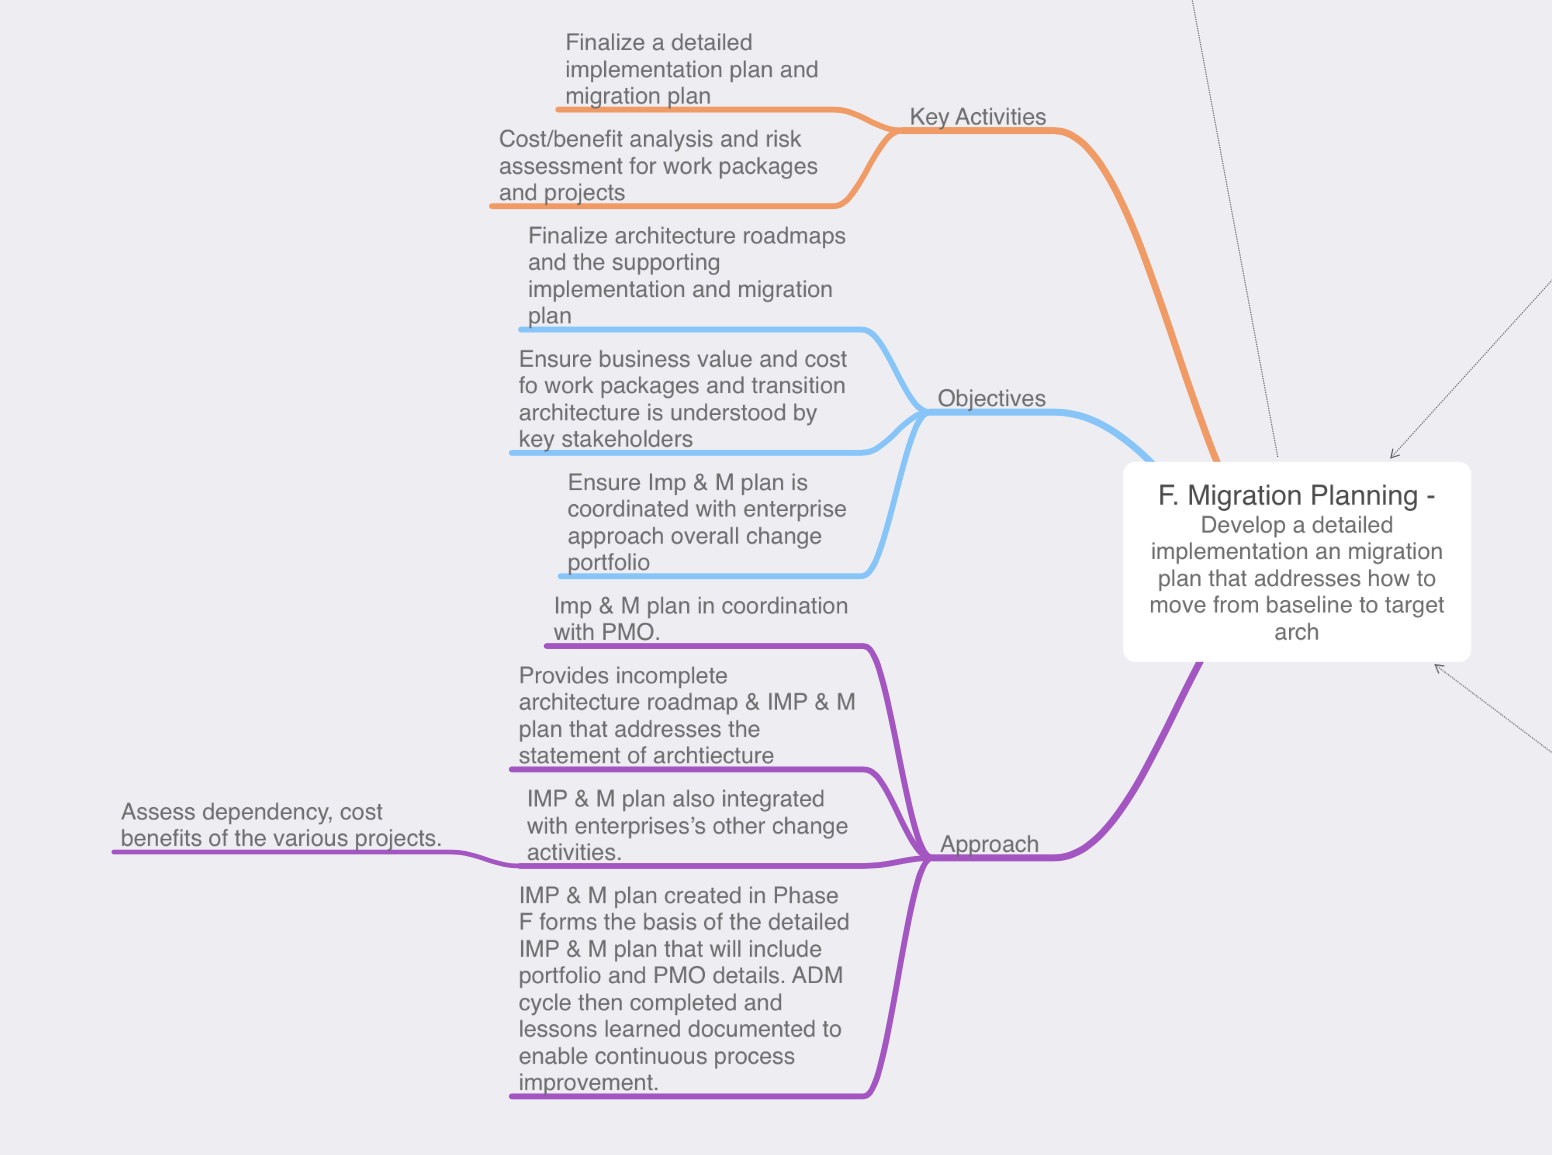
Phase F: Migration Planning: During Phase E we started defining the actions that will need to occur for us reach the target architecture, during Phase F however we will finalize that the transition architectures and communicate with the stakeholders regarding how the solution will be delivered
- We want to ensure that the stakeholders feel the implementation is a success, during this phase we will define CSFs (critical success factors). The CSF is a criteria that will tell us whether or not the stakeholders will consider the implementation successful.
- While TOGAF and Enterprise Architecture is typically and add-on framework this is also where we want to ensure our implementation is coordinated with any other areas of the enterprise such as an existing change control board or polices.
- Depending on the scope of the implementation we might have multiple work packages or implementations occurring to reach the target architecture, this is where we would re-visit our risk assessment and consider what risks may be relevant.
- On that same note if we have multiple implementations we will also to prioritize those work packages, which implementation has the most business value or offers an acceptable amount of risk?
- Determine if another iteration of the ADM needs to occur in order to accommodate one of the many work packages/implementations.
- Finalize the implementation plan.
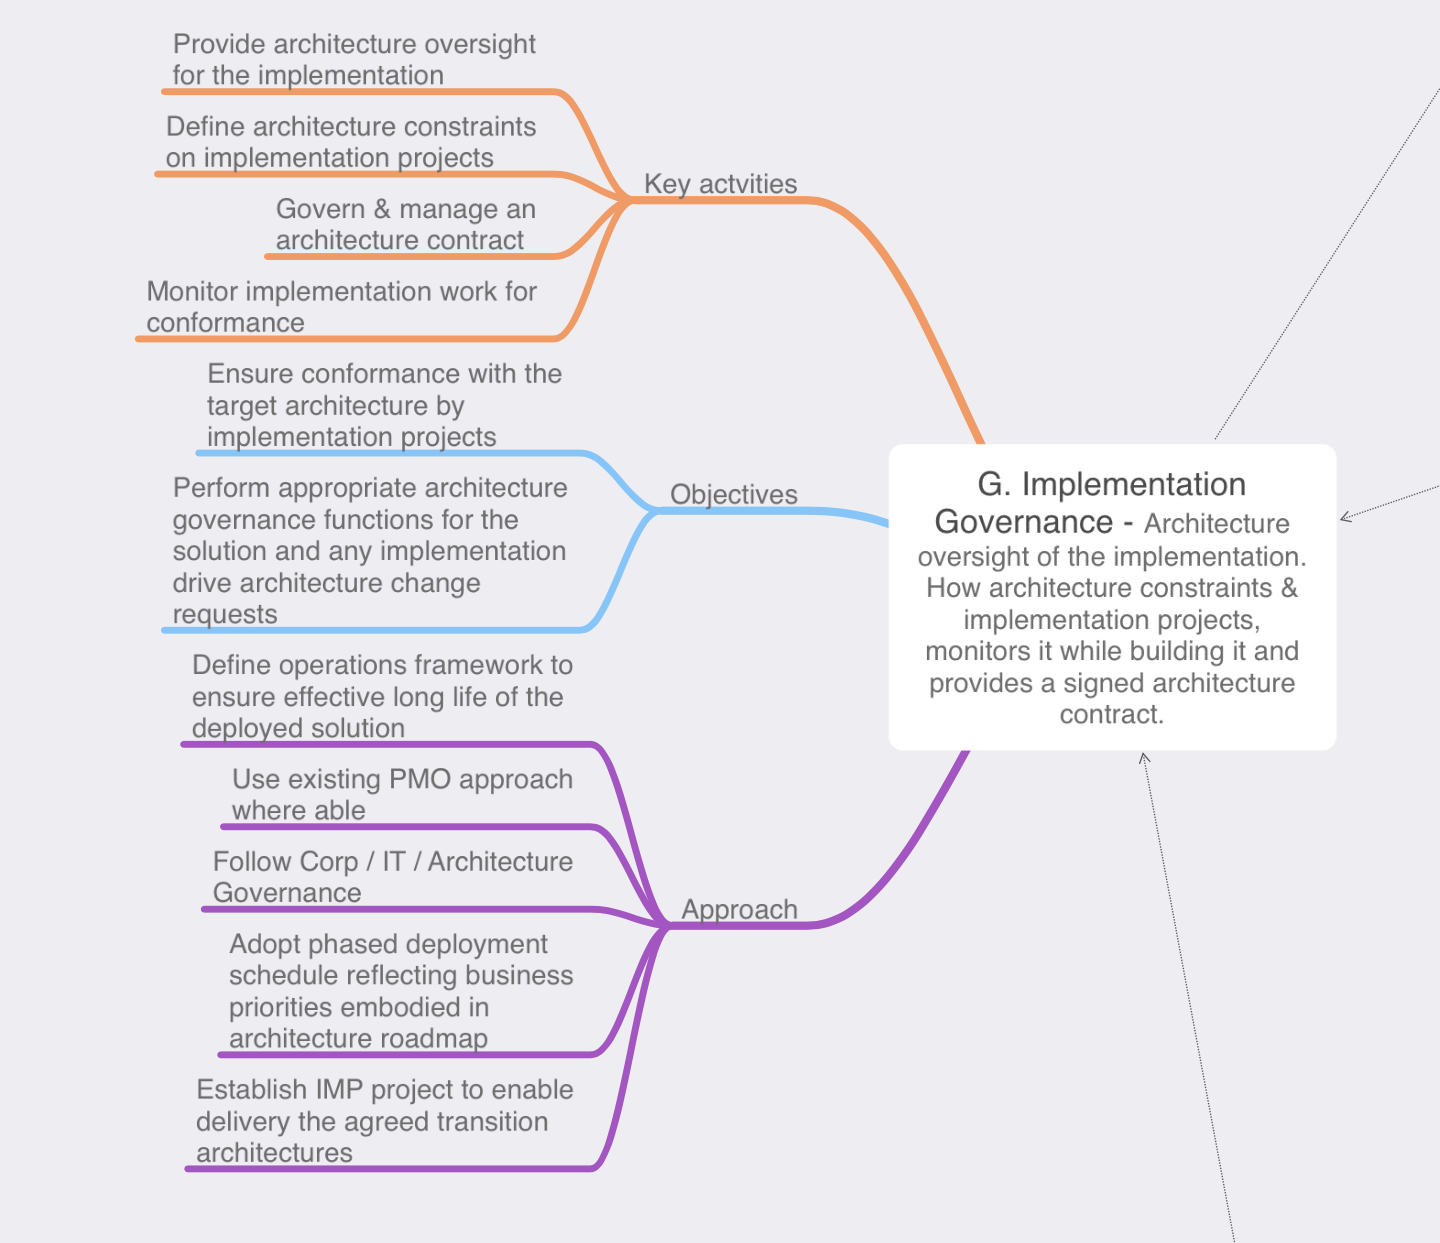
Phase G: Implementation Governance: This phase is rightly named as the architecture team won’t be performing any implementation tasks, the architects will be keeping an eye on the work to ensure that implementation plan set forth in Phase F is followed by the implementers. In Phase F we have set expectations with the stakeholders, we know the risks, timing, and the business values of the work packages being implemented now we need to ensure that becomes a reality.
- Ensure the implementors understand the priorities
- Setup architecture compliance reviews to ensure the implementation conforms with the implementation plan set forth in Phase F while also ensuring any risk associated with the work packages remain within any discussed or acceptable thresholds.
- Review the implemented product and close the implementation from an architectural perspective.
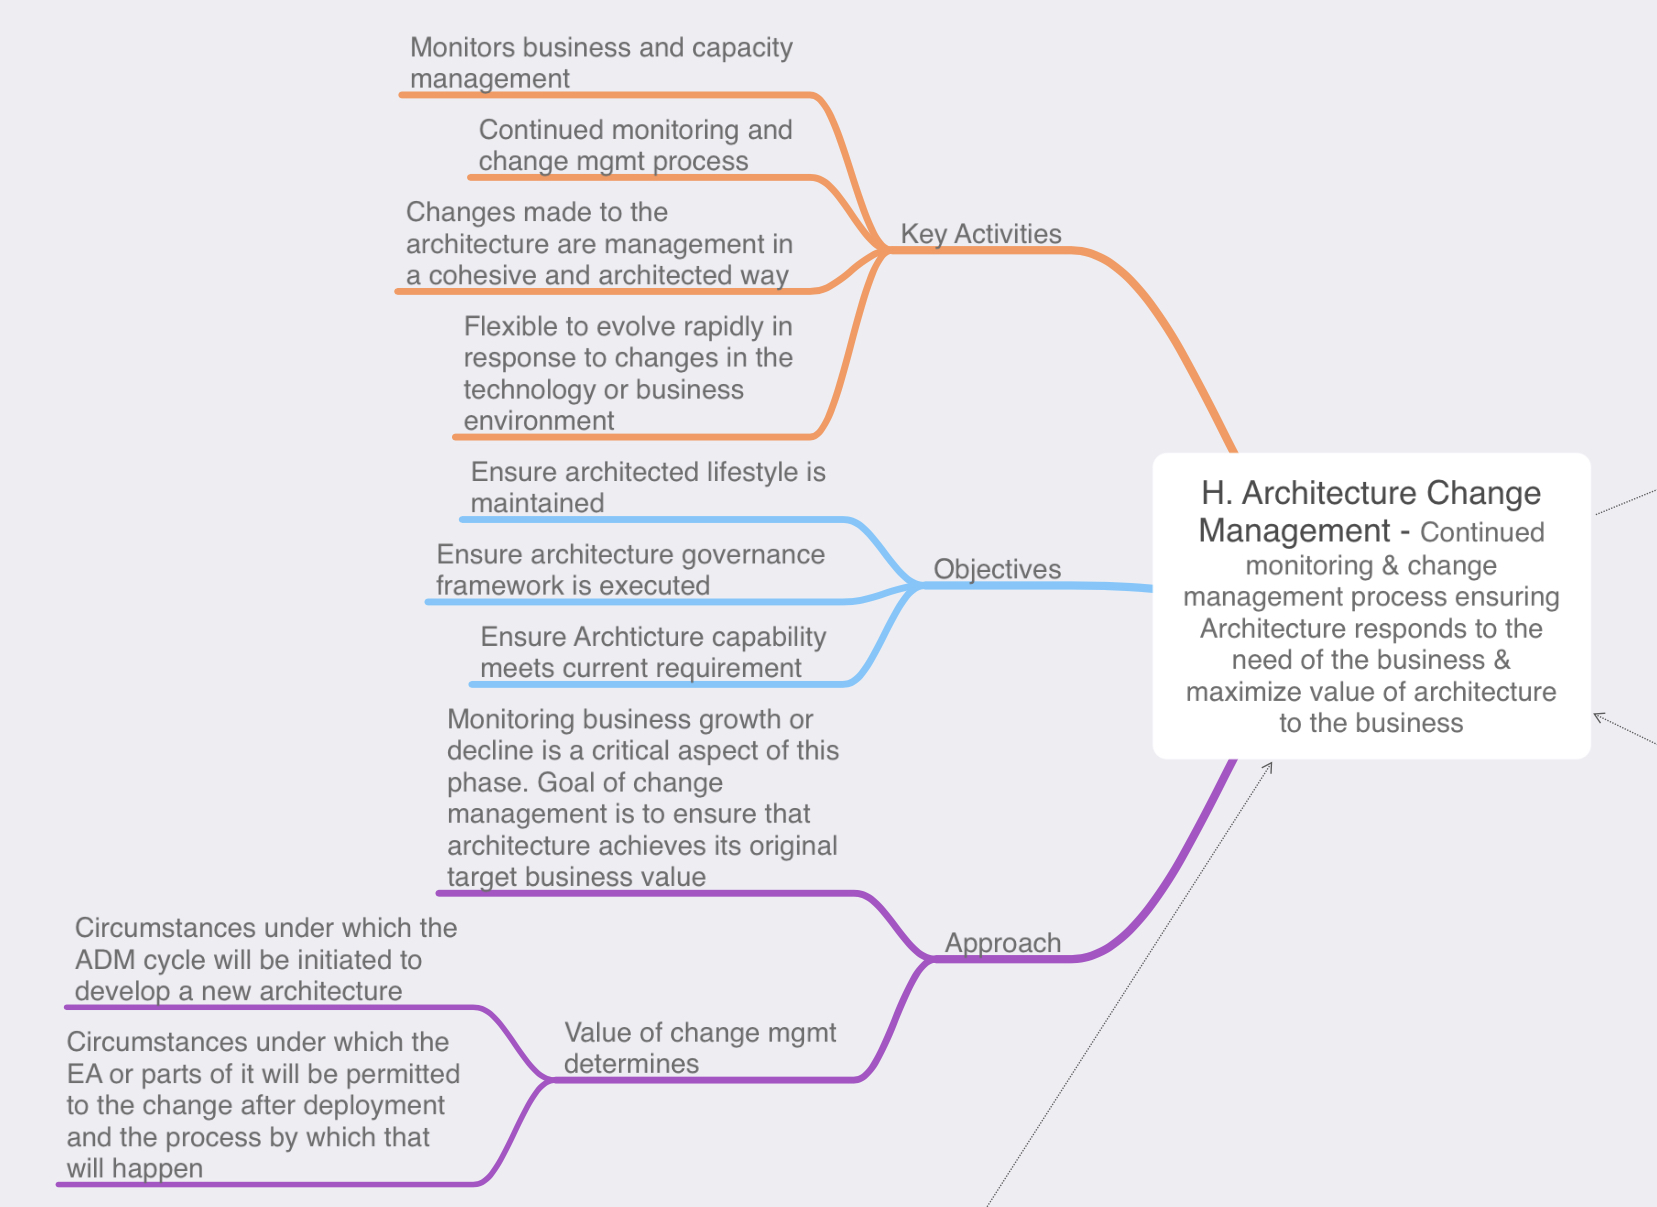
Phase H: Architecture Change Management: Our solution has been implemented, delivered the business, and now it’s time sit back in our cozy chairs and relax right? Well, not really after a solution has been delivered and is being used by the business we need to ensure that the solution remains relevant and in sync with the business needs as the business requirements begin to change over time. As time progresses the business may need to add features or functionality to enhance the business value of solution this in turn would be requested via a ‘architecture change request’ it is then up to the architecture team to evaluate the nature of the proposed change. Then determine if this is a simple change that can be implemented via the typical enterprise’s change management process of if the requested change will require a re-design and the ADM cycle will need to be re-initiated in some fashion. In tandem with this the architects are also governing the changes to ensure the solution remains in line with business requirements and any IT, Enterprise, or architecture principles. Architecture change management can involve the following:
- Deploy monitoring tools – This include monitoring the technologies as part of the solution or even the business value
- Manage risks and the governance process
- Develop change requirements to meet a target architecture
- Analyze the change
- Starting or activate the process of implementing the change
Phase: Requirements Management: Similar to the preliminary phase the requirements management phase is outside of the phased ADM cycle, but is just as important as any other phase if not more. The requirements management phase interacts with every other phase providing a way tracking and managing the inputs & outputs from every ADM phase. This information is tracked in the architecture repository.
That wraps up our run-through of the TOGAF ADM, while this was extremely high level I hope it offers a little insight to purpose and importance of each phase. There is much more to be said about the ADM and each individual phase, I could dedicate a post to each phase specifically but I wanted to start with a high level overview first.
The TOGAF ADM – Part I
In my last post we briefly looked at the TOGAF ADM. We won’t be able to fit it all into a single blog post but we will start to explore the ADM from a high level. ADM stands for Architecture Development Method and it organized in 10x different phases. These different phases are designed to assist organizations with keeping their business objectives & goals aligned the associated IT organization. IT departments have grown to be an important part of everyday business and even though we are in 2019 some companies still struggle with the relationship of aligning the business goals and their IT acronym jargon. The ADM works in a scalable phased approach allowing the left hand (the business) and the right hand (the IT department) to collaboratively work through meeting the desired objectives. Without further ado let’s jump in!
Preliminary Phase: The Preliminary Phase is an odd one, because it is outside of the phased ADM cycle however it is an important phase because this is when the architects get together and begin defining how the ADM will be interoperate within the company.
The following are outlined during the preliminary phase:
- Architecture principles – Principles that align with the business and IT principles which will provide high level guidance on how the architecture team operate.
- The scope of the enterprise – This how the architects determine how much of the enterprise they want to interact with and govern. The scope of the enterprise can also be broken apart by architecture partitions depending on the size and/or business goals of the Enterprise, or the different business units).
- Creating the architecture team.
- Identifying other processes that the TOGAF may need to interoperate with. (ITIL, change management, PMO, etc)
- Governance methods.

Phase A: Architecture Vision: This is essentially the beginning of the architecture work and is kicked off by a Request for Architecture Work where a member of the enterprise wants to accomplish a goal and requires the architecture board to oversee the task. One of the big key points is to ensure the architecture work is sponsored by a high level member of the enterprise to ensure the architecture team has the authority and political backing to manage the project.
In Phase A, we our primary focus is to gather as much information as we can about the request. This where we ask the important questions:
- What are the business goals.
- Who are the stakeholders, what are their concerns or constraints, and creating a communication plan for keeping the stakeholders informed as the architecture work progresses throughout the ADM. Let’s also keep in mind the stakeholders might not be only on the business side, you will likely have stakeholders on the IT/IS side depending on the scope of the project.
- Define the target architecture and identify risks that may concern the stakeholders during the journey of getting too that target architecture.
- Develop / define the architecture vision and secure approval for the Request for Architecture Work document.

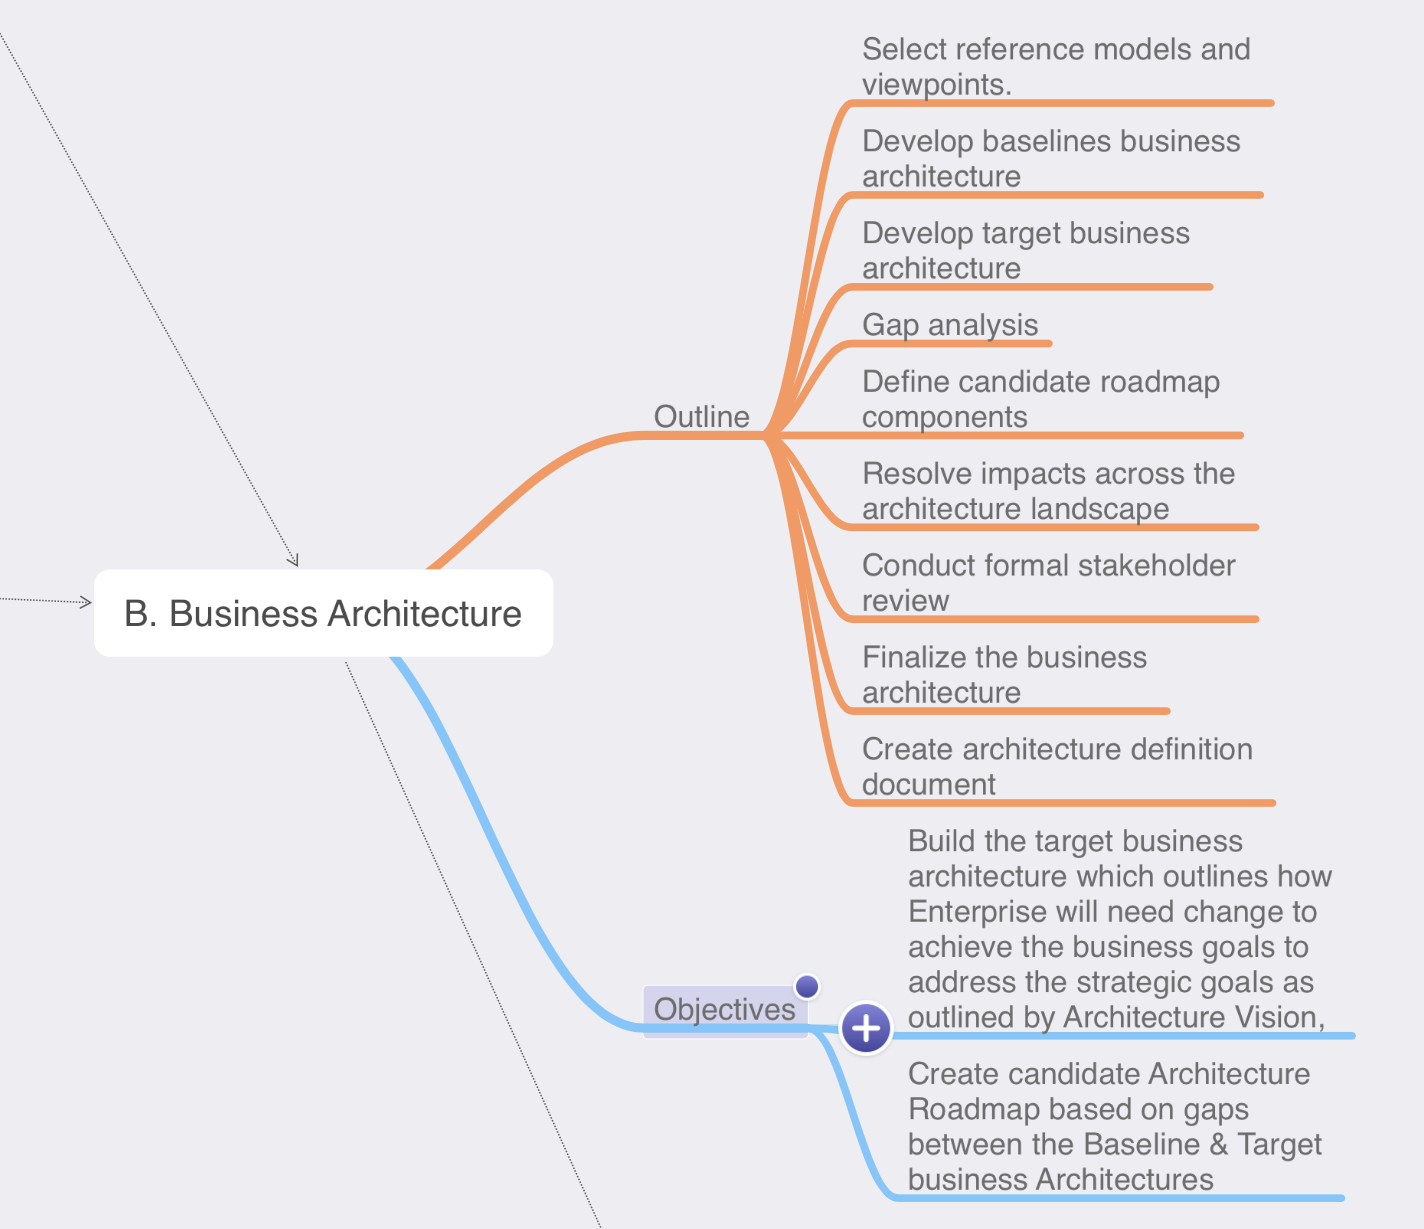
Phase B: Business Architecture: In Phase B, we continue to build off the information we gathered in Phase A. We continue our conversation with the stakeholders and determine each of their concerns. These concerns can be referred to as a view this ensures we know what each stakeholder is looking for allowing us to meet each of their requirements of the project. If the stakeholders do not feel their deliverables have been met they might not consider the project a successful.
We also need to consider what business processes are existing today (baselines) and what the target business architecture is. Once we know where we want to be, some type of gap analysis will be performed to identify what deliverables need to be implemented in order for today’s baselines architecture to meet tomorrow’s target architecture. Once we have gathered all the information we should have a complete business architecture document.

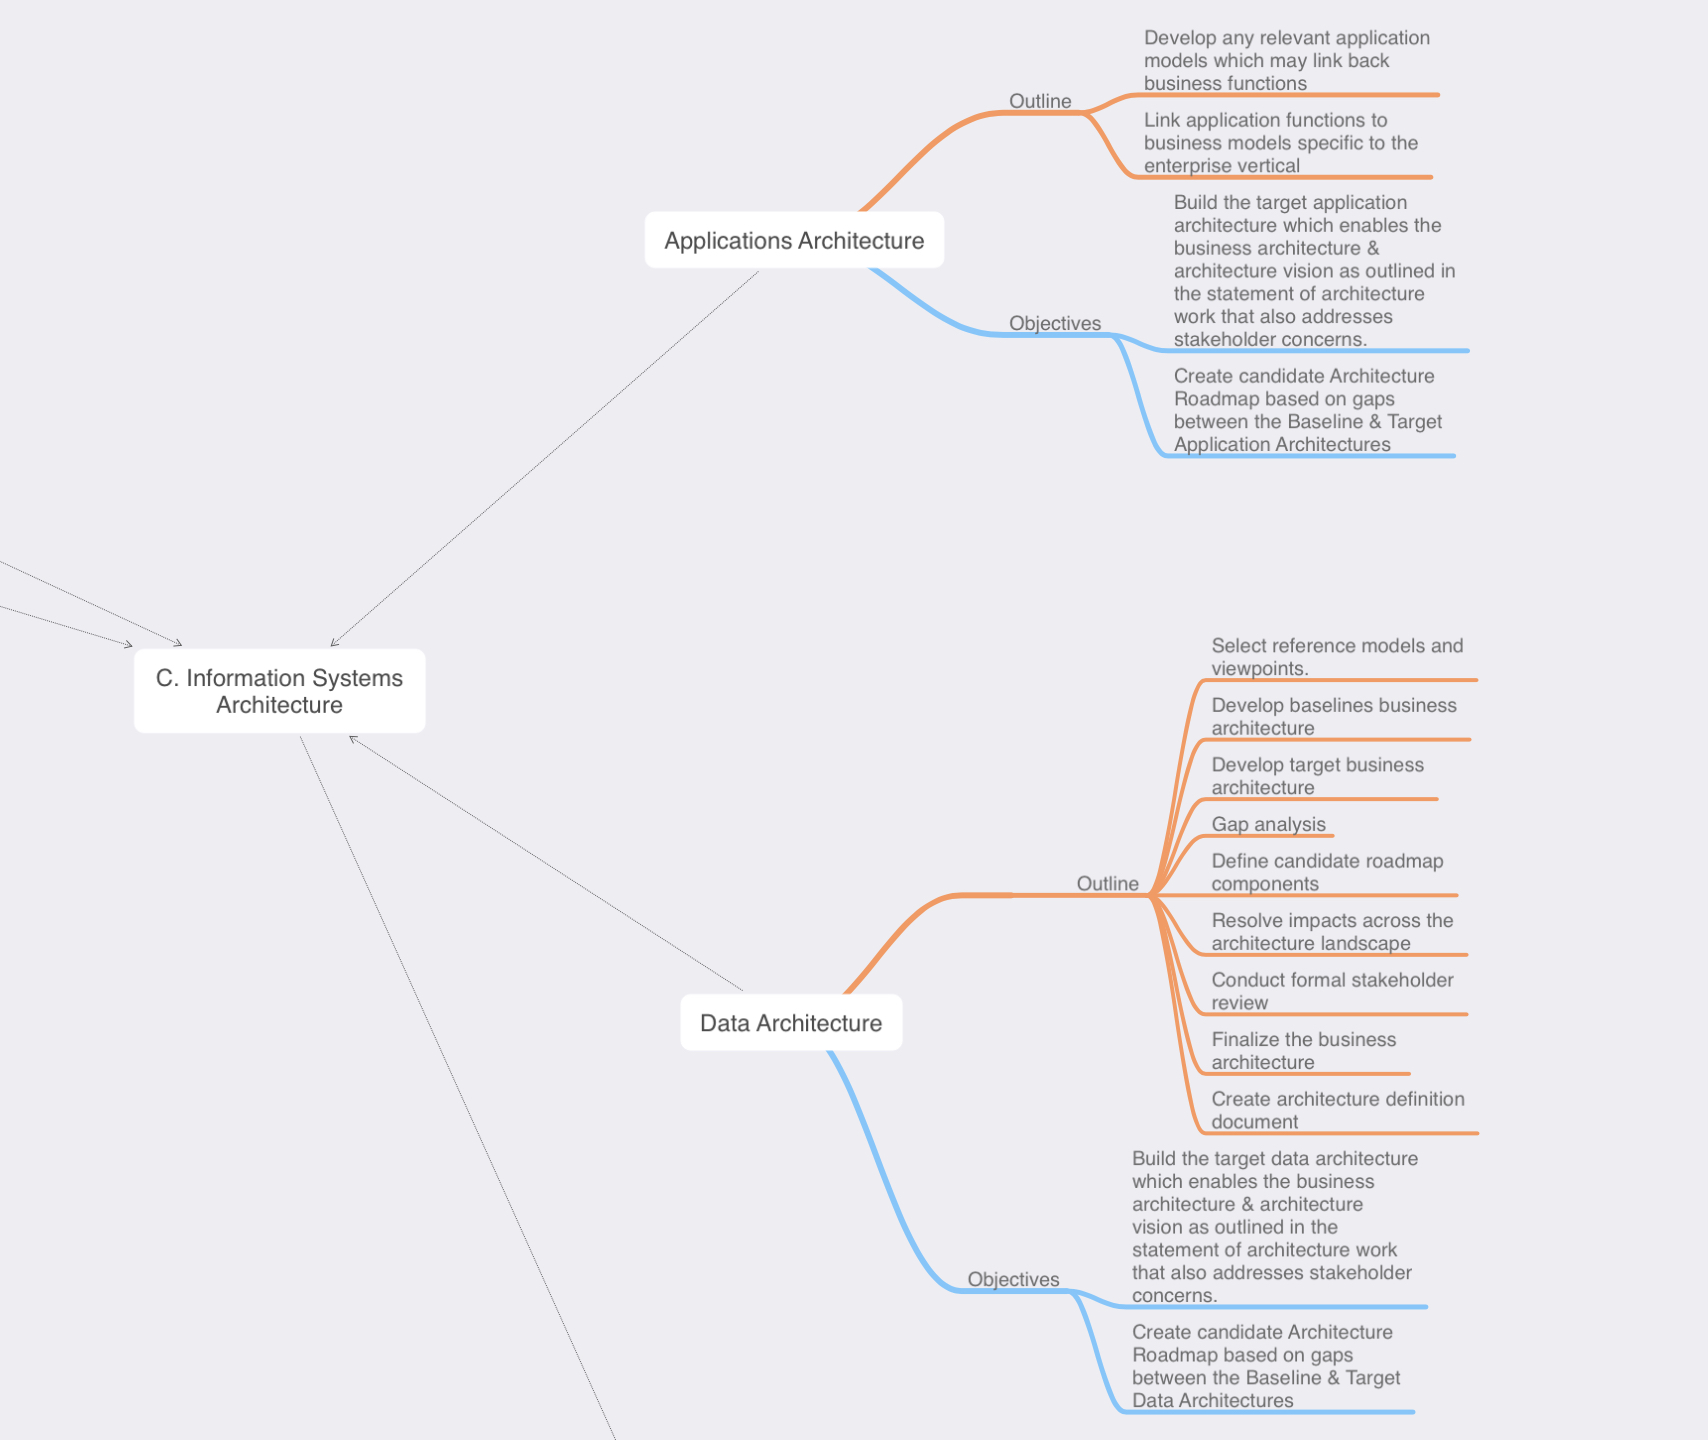
Phase C: Information Systems Architecture: Phase C is really broken down into two separate domains, both of the domains follow a similar pattern and can be carried out simultaneously. TOGAF understands the importance of focusing in both the data & system/applications separately:
Data Architecture – Here we are talking about the data. TOGAF places emphasis and importance of the actual data, an important element that has not been brought up yet is the concept of building blocks and re-usability, if we can re-use this same data in another application or project that can minimize effort down the road making further project easier and potential cost loss. That is just one (or two) reasons why the data architecture is important.
Understanding that data architecture comes from knowing:
- What data the stakeholders need.
- What data do we have today (Baseline architecture), can any existing data models be re-used?
- What data do we need to compile or collect to accomplish the desired architecture (target architecture).
- This will lead you to perform some type of gap analysis, and then create potential roadmaps to get to your target architecture.
System/Applications Architecture – This sub-phase is conducted similar to the data architecture section, replace the the word data with application and add in any specific application or software flow diagrams.
- What software/applications do we have today (Baseline architecture), can any existing applications models be re-used?
- Define your application or functionality matrixes/diagrams. We are still very early in the ADM so most deliverables are still high level but having an understanding of what business process is linked to which application feature & what data each feature may need to interact with. We also may start considering user roles and permissions.
- This will lead you to perform some type of gap analysis, and then create potential roadmaps to get to your target architecture.
Phase D: Technology Systems Architecture: The is where we starting to consider the communications and compute requirements for accessing the data and applications. Since my experience is on the networking side of the world this is typically where I would really getting involved in some discussions. Hopefully though I would already be aware of this, as I should have been identified as a stakeholder in Phase A.
Phase D, follows a similar path as to what we did in Phase C, however it will be specific to the system/network concept.
- Are their existing technologies standards or implementations that can be used.
- Understand your baselines and target architectures.
- This will lead you to perform some type of gap analysis, and then create potential roadmaps to get to your target architecture
- Gather the requirements from the stakeholders, some key points you want to understand are the desired performance, availability requirements, latency, etc.
- What kind of diagrams or models will need to understand and convey the architecture deliverables.

From a quick high level, Phase B, C, & D following a similar routine however they each focus are their specific knowledge domains. Now, to keep this post from running away, I am going to be stopping here. The ADM is a powerful and detailed methodology, my goal here was to give a simple overview, we will continue exploring the TOGAF ADM in my next blog post.
Random Note: I created all the images in this post using a mind mapping application for note taking during my TOGAF studies. Sometimes mind maps can get a little out of control but I hope this format worked out well for presenting the ADM and the high level steps of each phase.

