Use your router to perform packet captures.
For quite some time now Cisco routers have had a feature known as EPC embedded packet capture, this feature allows you to perform packet captures directly on the interfaces making this one of the most useful features Cisco could implement (in my own opinion of course), a few things you can do with this feature:
- Listen to VoIP calls to verify quality
- Verify packet markings
- Troubleshooting connectivity issues
- and so on.
The best part of this, is the fact the configuration is fairly simple and you can begin capturing packets with just a few simple commands.
Here is a quick outline of the process:
- Create a buffer point
- Create a capture point
- Tie the buffer point & the capture together
- Start the capture
- Stop the capture
Now to dive a little deeper!
The buffer point is memory used to hold the packets captured and as we all know Cisco devices have a finite amount of memory on them and we would not want a packet capture to completely utilize all the space and cause other issues. So this where we limit what gets put in the buffer. On top of that we can also set filters based off an access-list in order to limit the packets we will capture, since in many cases we would not want to capture all the data traversing the router.


Buffer Point Options
Next we need to specify the capture point, this is where we specify the interface we want to capture on and in which direction we want to capture in. One thing you will need to specify is if you want to capture CEF or process switched traffic, this option in itself I think I just awesome (Of course most of the time you will capture CEF switched packets) but it’s nice to have the option. One thing I want to throw out there is yes you can capture on sub-interfaces.


You have the option to capture both IPv4 & IPv6 traffic
Now that we have created the capture point and the buffer point, we need to tie them together, this done with the following command:

All we need to do now is start then stop the capture, with the following command:

You can either manually stop the capture, or use one of the various options in the buffer point to trigger the capture to automatically stop.
Once the capture is complete you will most likely want to export the capture off the router and to your own workstation for deeper analysis in Wireshark or Omnipeek. You can export the capture off box by using protocols like TFTP or FTP, or even export the file directly to flash and come back to it later.
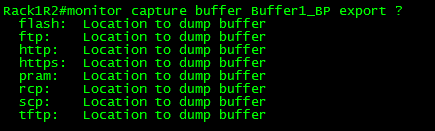
Buffer export options
Just think about the doors this opens for troubleshooting those odd random issues where you only wish you could capture the traffic for further analysis now you can!
Also think about the other cool things you can do with EPC:
- Utilize EPC on multiple interfaces at the same time, with multiple capture & buffer points. (Check out this page from Cisco)
- Use EPC in conjunction with kron jobs or EEM applets to perform on-demand packet captures.
- Much more


[…] now supports a proxy connection, I am going to need to check this out, as ciscodump utilizes the Cisco EPC capability. Which apparently I haven’t got to kick the tires on just yet. So, I think I am late to the […]
Wireshark 3.0 Released | CCIE or Null!
March 4, 2019 at 11:01 AM