IOS Conditional Debugging
I while back I mentioned it is possible to debug a single IPSec tunnel using crypto conditions, this functionality also extends outside of crypto conditions. IOS routers offer the functionality to create debug conditions and limit debug output to specific interfaces, ip addresses, and more see the following list:

You can also stack these debug conditions on top of each other:

You will see as you specify additional conditions it tells how many conditions have been set. Issuing the command show debug condition will display a list of debug conditions that been set.

One thing you will want to keep in mind if you do not remove these conditions is when you finished troubleshooting your problem you should remove these debug conditions are else they will affect any other debugs you run in the future. You can remove these debug conditions by issuing the command no debug condition. One thing to keep in mind is that you have the ability to remove the debug conditions in any order, using the above configuration as an example lets say you want to keep seeing debug messages pertaining to IP address 192.168.1.254 and also pertaining to any interface and not just when it includes interface fa0/0, you can issue the command the no debug condition condition 1 or no debug condition interface fa0/0 depending which method you find simplier.

While conditional debugging is a very powerful tool when troubleshooting, you will still want remember that debugging can be very processor intensive and still might hinder performance on a production router, after all the debug is still running using debug conditions just limit the messages you will see.
DHCP Reservations on a Cisco ASA 5505. Maybe?
So the Cisco ASA 5505 is the smallest ASA firewall in the ASA family, only designed for SOHO and real small branch office. It’s even cheaper than most of the current 800 series routers, can provide IPSec VPN access, AnyConnect access, and basic routing sounds like a great deal right? Well, it is however after a while you will notice some functionality is missing from this nice ASA that we take for granted in our normal everyday ISR Routers.
One of those of features is the ability to setup a DHCP reservation, the 5505 can run a DHCP server with various scope options but the ability to setup reservations has been left out. We can only speculate as to why such a simple feature would be excluded. However setting up a static ARP entry provides a quick work around for this feature. Somehow when the static ARP entry is configured, the ASA apparently knows not to hand out the address to a different host. I tested this out with a scope handing out a single IP address and a scope handing out multiple addresses with the same result. The end device configured with the static entry got the IP address in the static ARP entry configuration. When the scope was configured with a single address and a static ARP entry, I connected a different PC and the ASA would not hand out that single IP address to a different host.
However, one small caveat this feature is not supported by Cisco TAC so if you put in a ticket about DHCP reservations and static ARP entries you won’t get too far. I tested this on a few different 8.4 versions with success but since it isn’t a supported feature I wouldn’t really rely on this for anything mission critical but it something to keep in mind if you are in a pinch.
Let’s check out an IPv6 header.
I touched on the IPv6 addressing scheme a few weeks ago before and I wanted to continue the trend into a few more IPv6 related posts but that last IPS post spiked my interest, so I had to publish that one. Now we know the addressing scheme is different in IPv6 but what about the packet format? Obviously the packet headers will be larger because the source and destination addresses within that header are now 128 bits but let’s see what else we have in the IPv6 header:

Now that doesn’t look too intimidating right? I think that looks a little simpler compared to the IPv4 packet header. Now let’s see what we got going on here:
- Version: This field is in an IPv4 packet and simply tells us what version of IP we are running. Since this is an IPv6 packet it’s going to have a value of 6
- Traffic Class: This is the equivalent of the DiffServ/DSCP portion of the IPv4 packet which carries the QoS markings of the packet. Just like in IPv4 the first 6 bits are designated for the DSCP value, and the next 2 bits are for ECN (Explicit Congestion Notifications) capable devices.
- Flow Label: This field is 20 bits long and is defined in RFC 6437, I’ll admit finding information about the flow label is tough, but the RFC state this field could be used as a ‘hash’ for the routing devices look at and make forwarding decisions based on the field’s value. Its intention is for stateless ECMP (Equal Cost Multi-Path) or LAG mechanisms, but we will have to see how different vendors implement this feature. I’d take guess that IPv6 CEF will use the flow label, but I’ll have to wait and see.
- Payload Length: Specifies the size of the data payload following the IPv6 header.
- Next Header: This field is 8-bits and specifies the layer 4 transport protocol which follows the IP header. These values are hex format as well, you’ll notice ICMPv6 has a value of 0x3a, IPv6 protocol numbers use the same numbers that were used in IPv4. IANA’s list of protocol numbers can be found here.
- Hop Limit: This is also an 8-bit field and replaces the TTL field that was in the IPv4 header. Each hop decrements the hop limit value by 1 and when the hop limit reaches Zero the packet is discarded.
- Source/Destination: This should go without saying but it tells you the source IPv6 address of the packet and the destination IPv6 address this packet is destined to. As you would expect both of these field are 128-bits each.
So there is a snappy run down of the IPv6 IP Packet header, I think it is actually simpler than the IPv4 IP packet headers but don’t tell that to a Cisco router. Remember these packet headers are considerably larger than their IPv4 counterparts so it takes more processor power to process IPv6 packets which is not a problem for the ISR G2’s we have todays but it is something you might want to keep in mind when run IPv6 on older hardware.
Now back to CCIE: R/S Labbing I go!
When does the Cisco ASA IPS module inspect traffic?
Sure we can put an IPS module inside an Cisco ASA firewall but the first you may ask or will be asked is at what point does that traffic get inspected by the IPS Module? Which might not seem like a tough question but it can make you think if you got VPNs terminating on your ASA, does it inspect the traffic before encryption, after encryption, or is encrypted traffic bypassed? I did a post about the packet flow through a Cisco ASA some time ago and it did mention the IPS is involved after NATs, application inspection, and even ACLs however there was no mention of how encrypted VPN traffic.
Well, as it turns out the traffic is redirected to the IPS module after it enters the ASA on the ingress interface, the VPN traffic is decrypted, and the firewall inspection policies have been applied. Now for outgoing VPN traffic the IPS inspects that traffic and then it is encrypted and sent through the IPSec connection. Makes perfect sense.
Here is a quick visual from Cisco.com:
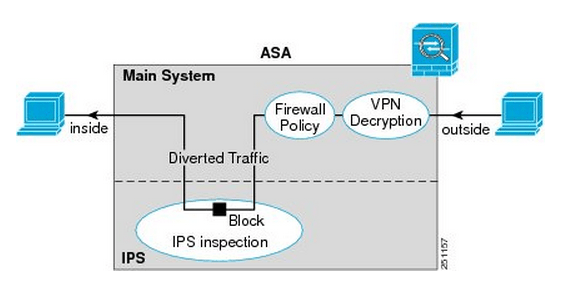
You’ll notice once the traffic enters from the outside interface, if it is VPN traffic it is then decrypted sent though the firewall policies and is then diverted to the IPS module. Once the IPS module has had a chance to inspect the traffic it is then sent back to the ASA to be sent out the inside interface.
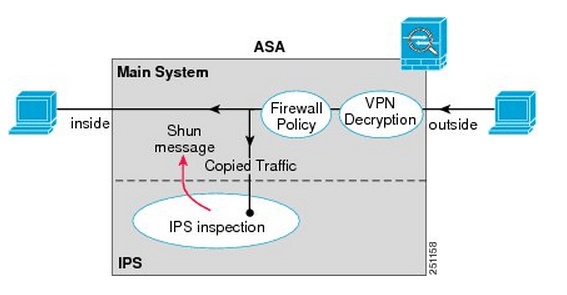
Something I want to point out the IPS Modules work in 2 different modes, inline mode which is shown above where the traffic is sent through the IPS module and back into the ASA this mode may degrade throughput depending on the model of the module and the amount of traffic being inspected. We also have Promiscuous mode where the traffic is not sent directly though the IPS Module but the IPS module instead receives a copy of the traffic to inspect. The upside of promiscuous mode is the fact throughput is not effected however it is less secure than inline mode since the traffic sent to its destination at the same time it sent to the IPS module, the IPS module however can sent a RST packet ending connection or ‘shun’ the offensive IP address. When an address is ‘shunned’ any traffic from that source is dropped.
Here is a quick visual of promiscuous mode:
You can read more about the IPS ASA module inspection process here.
Checking out IPv6 addressing.
IPv6 definitely a subject that is being pushed more and more as time passes, with good reason it’s the way the internet is moving. I’m not going to cover the history of IPv6 and why we are going to start seeing IPv6 becoming more and more prevalent as time goes on, but we will take a quick high level view of some of the major differences of IPv6 addressing for example:
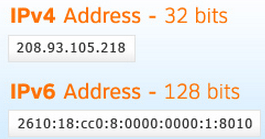
The address format, as we are well aware of IPv4 address are 32-bits long broken up into 4 octets that are 8-bits long. This format has been accepted so everyone is comfortable writing, memorizing, and understands this format.
IPv6 addresses on the other hand are 128-bits in length making it near impossible to continue the decimal format we all know and love in IPv4. That’s why the IPv6 address are represented as 32 Hex characters (compared to 128 decimal characters). This 32 character hex IPv6 address is then broken down into 8 sections of 4 hex characters separated by colons. So if we take a closer look at this break down each of those 8 sections represent 16-bits, and 16*8=128, so each individual character within the IPv6 address represents 4-bits and 32*4=128, so hopefully this paragraph clarifies the reasoning of why IPv6 address has been formatted this way. 32 character hex addresses will be easier to work with than a 128 character address. (Granted shifting gears from decimal to hex formatting will be tricky enough in itself).
So with this new address format, the next question you must have is how do we subnet with IPv6 addresses. Luckily for us subnetting (along with route summarizing) is done just like it is done with IPv4, granted with IPv6 we will be summarized in hex and not just decimal numbers. I’ll cover summarizing IPv6 in a future post.
Lets also touch quickly of the different type of addresses, perhaps the biggest change here is the fact that IPv6 has done away with the broadcast any IPv6 communication will be one of the below:
Link Local: The link local address is designated as FE80::/10 and will exist on every IPv6 interface the important thing to remember about the link local address is the fact it well never be used to communicate with hosts outside that local subnet, the link local address is only used for communication on its local subnet. This link local address is also used by OSPFv3 and EIGRP to establish neighbor adjacency and will be used as the next hop address.
Anycast: A new type of address, in which the same address is assigned to multiple nodes, when a packet is destined to this anycast address it will routed to nearest member of the anycast group.
Multicast: Treated similar to how it was treated in IPv4, and One-to-Many communication. (Multicast functionality has been improved upon since its implementation in IPv4). The key difference between Anycast and Multicast is the fact that the packet will be delivered to every device in the multicast group, where-as the Anycast packet is only delivered to the nearest device with the Anycast address assigned to it and not to every device with the Anycast addressed.
Even though these IPv6 are 32 hex characters we do have a few ways to cut down on the size of the actual IPv6 address to make it a little easier:
1. Leading zero’s can be removed so 2001:0db8:85a3:0042:0000:0000:0370:7334 could be typed as 2001:db8:85a3:42:0:0:370:7334 which helps by cutting out a few numbers but there is still another way we can make this address a bit more manageable.
2. Consecutive zero’s can excluded so 2001:db8:85a3:42:0000:0000:370:7334 could further be summarized to 2001:db8:85a3:42::370:7334, however this rule can only be used once so you can exclude one set of consecutive zero’s
Video: Configuring HSRP
Put together a quick video about configuring HSRP and many of its features: Tracking, Preemption, tweaking timers, changing priorities, and more.
Let me know what you guys think, this is the first video and I am still looking at different recording software or just different styles in general. You’ll be seeing more of these videos as time goes on!

